Getting Started
Eager to get started? This page gives a good introduction to Nereid Project. It assumes that you already have Nereid and Nereid Project installed. If you do not, head over to then Installation section.
A minimal application
A minimal Nereid application first requries a Tryton database with the Nereid module installed. If you already have a database with Nereid installed head over to creating website.
Setting up a database
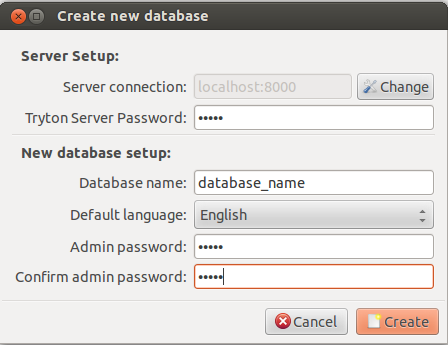
To create a new Tryton database, you will need to fill out the information as on the screenshot:
- Server connection : localhost:8000
- Tryton Server Password: admin
- Database name : database_name
- Admin password : admin
This is how you can create a new database. Now to login your ERP using the Tryton client, you need the following information:
- Host : localhost:8000
- Database : database_name
- User name: ‘admin’ or Ask your administrator for this information.
- Password : ‘admin’ or Ask your administrator for this information.
Creating a new website
Once the nereid module is installed in a Tryton database, open the Websites menu under Nereid/Configuration, and create a new website with the following settings.
Field Value Name abcpartnerportal.com URL Map Choose Default Company Choose your Company Default Language English Guest User Create a new Nereid User App User Create or choose a User
The default language is the language your website is displayed in. When a user visits the root of the website (say example.com), the user will be redirected to abcpartnerportal.com/default_language/
Example: If English US is selected as Default Language, then the user will be
redirected to abcpartnerportal.com/en_US/
This is the tryton user with which the application will run. Ensure that the user you choose has the sufficient permissions (through groups) to access and update tryton models related to project management.
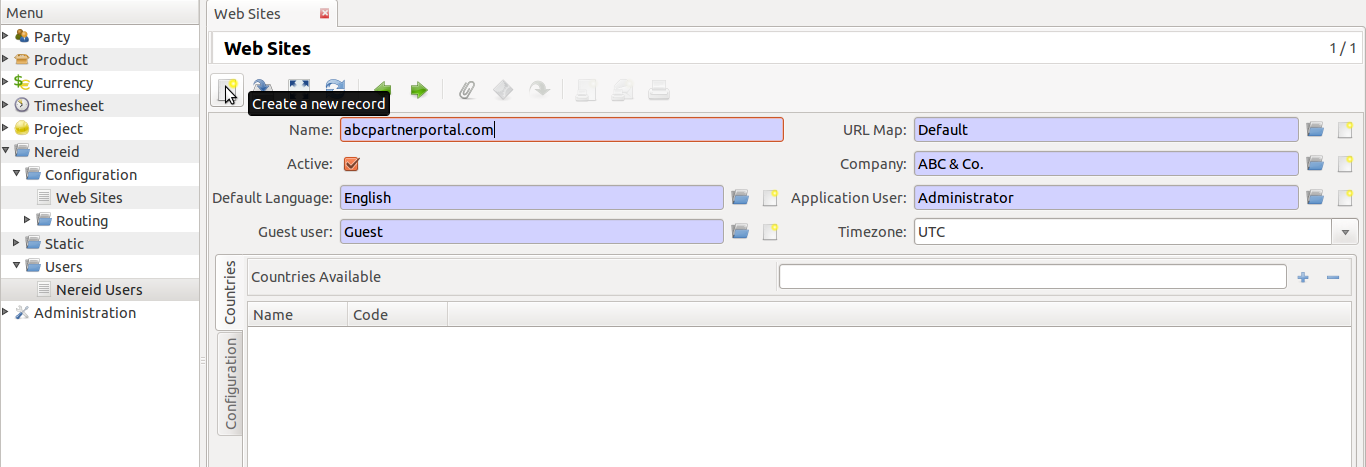
When the web site is created. It is recommended to create a new Nereid User. Here in above screenshot a new nereid user as a guest is created. But for giving privileges to the project, you need to create other nereid users also, they can be employee of your company, the clients, the stakeholders, etc.
Refer to the nereid.trytond_nereid.website.WebSite for details on what
each of the fields mean.
Tip
Since version 2.0.0.3 the name of the website is used by the WSGI dispatcher to identify the website that needs to be served. When you test the site locally, it is not usually possible to mimic your production url. This can be overcome by using a simple WSGI middleware which overwrite HTTP_HOST in the environ.
Admin Users
Project Admin / Manager
After creating website as mentioned in creating website, create a new admin user by adding project admin or project manager permission as shown below:
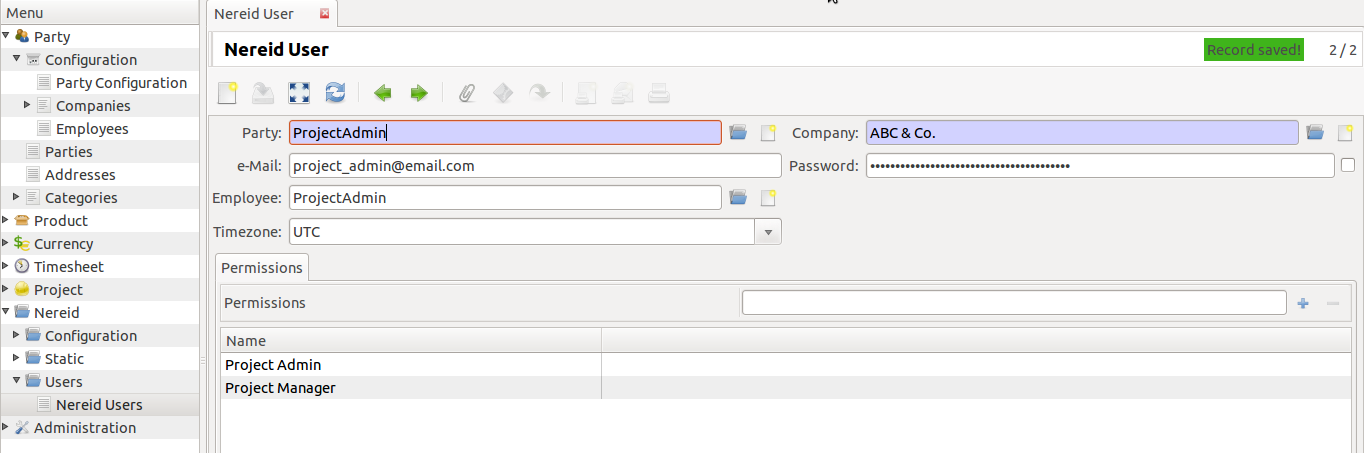
Project Admin has complete access to entire project management system.
Though project manager is limited just to:
- Global Timesheet
- Performance Graph
- Tasks By Employee
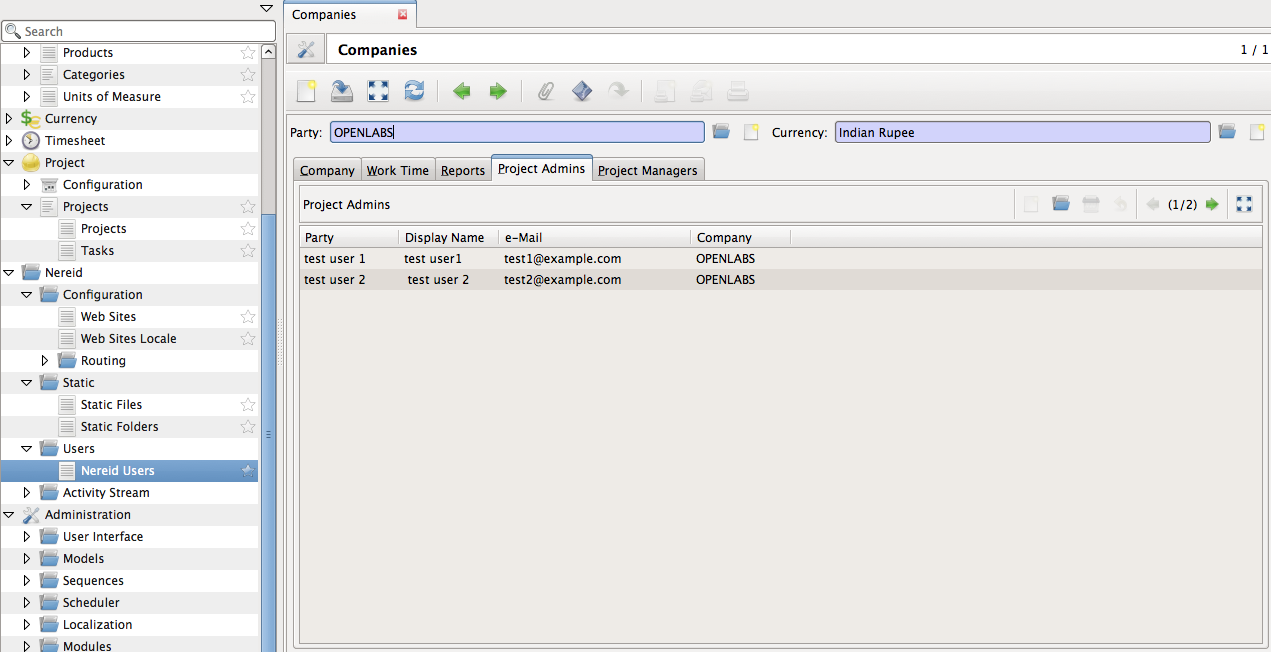
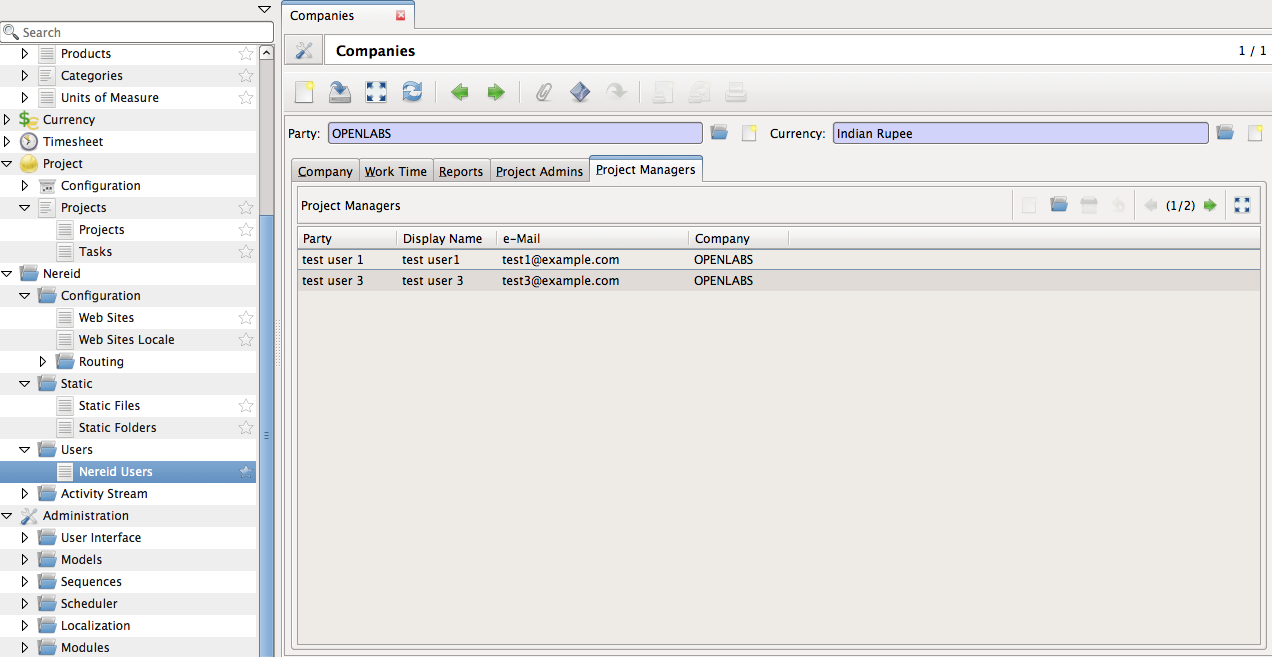
All the project admins / managers of company can be seen on company’s
screen using Project Admins or Project Managers tab.
Admin Member
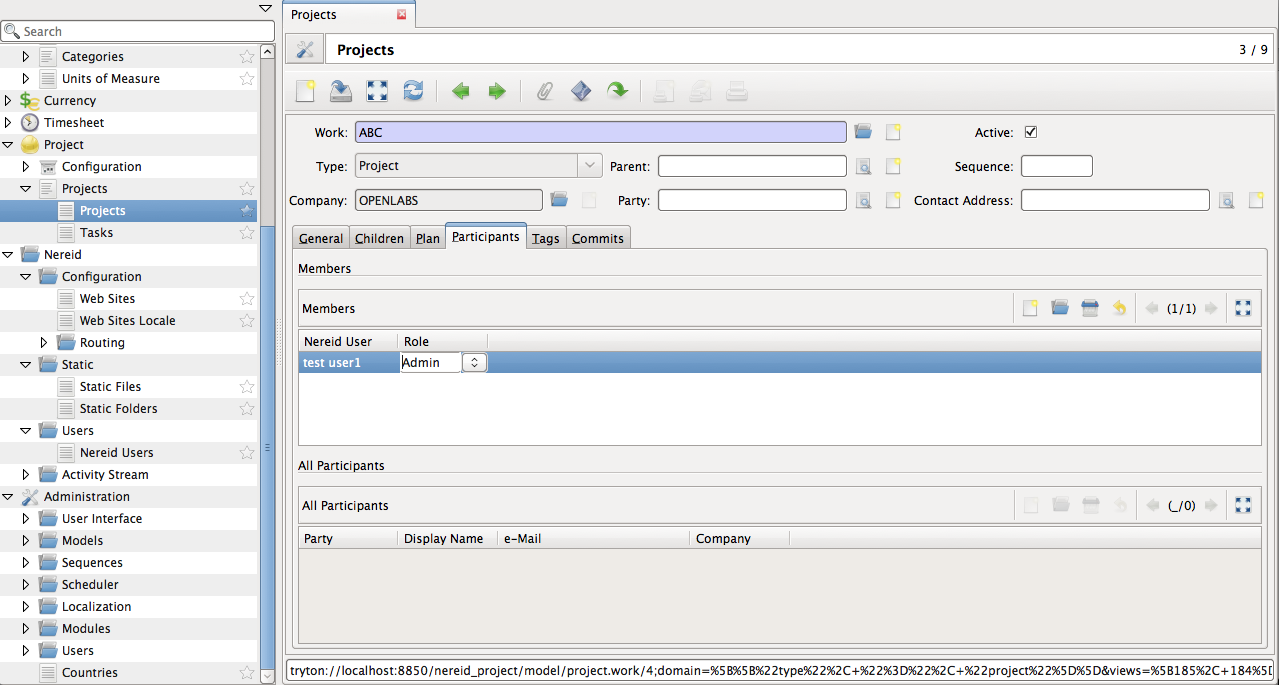
Admin member is project specific nereid user with role as admin. This admin member is allowed to do anything but only inside the entire project where he is added as an admin member. There can be multiple admin members of a project.
To add admin member of the project, open the project and add members using
Participants tab as shown below.
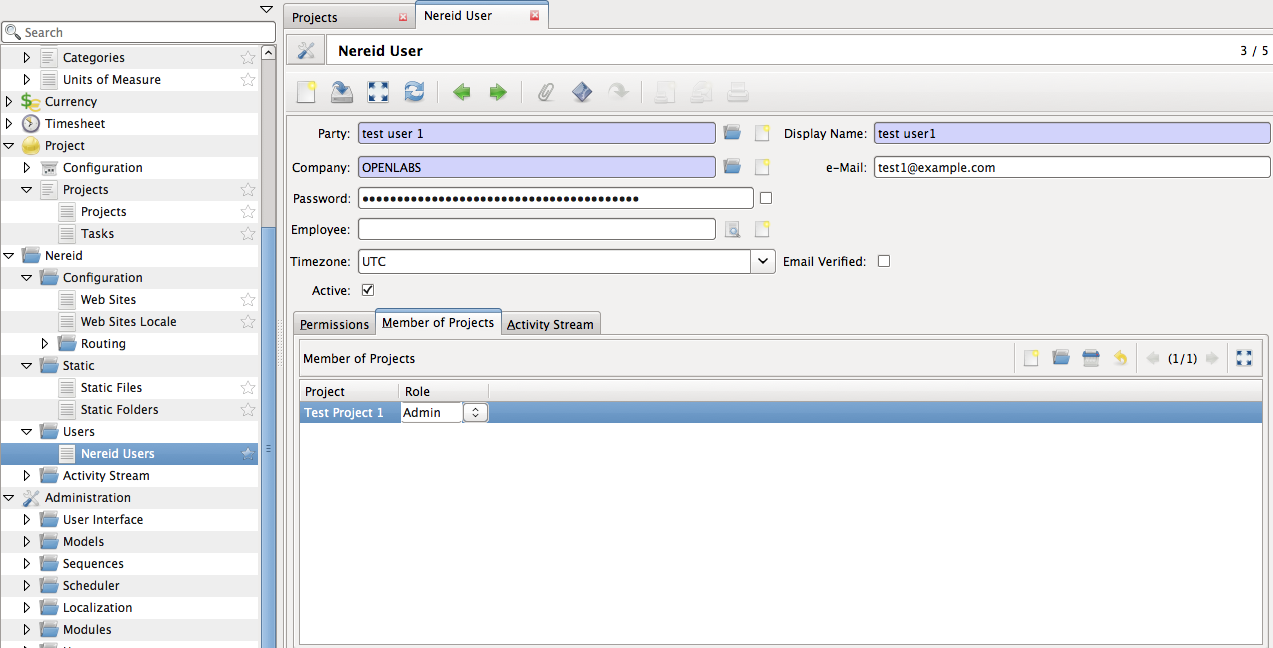
Alternatively, projects can be added with admin rights to nereid user.
To add projects with admin rights, open nereid user and add projects using
Member Of Projects tab as shown below:
Launching the application and template
Once the website is created, a python script which loads nereid and runs the application needs to be written. This script is used to load Nereid, configure your application settings and also serves as an APP_MODULE if you plan to use WSGI HTTP servers like Gunicorn
Note
DATABASE_NAME has to be changed in application.py. Mention the
database name you have created while setting the database in tryton client,
and also the site name which you mentioned while creating the website.
#!/usr/bin/env python
from nereid import Nereid

CONFIG = dict(

    # The name of database
    DATABASE_NAME = 'database_name',

    # Static file root. The root location of the static files. The static/ will
    # point to this location. It is recommended to use the web server to serve
    # static content
    STATIC_FILEROOT = 'static/',

    # Tryton Config file path
    TRYTON_CONFIG = '../etc/trytond.conf',

    # If the application is to be configured in the debug mode
    DEBUG = False,

    # Load the template from FileSystem in the path below instead of the
    # default Tryton loader where templates are loaded from Database
    TEMPLATE_LOADER_CLASS = 'nereid.templating.FileSystemLoader',
    TEMPLATE_SEARCH_PATH = '.',
)

# Create a new application
app = Nereid()

# Update the configuration with the above config values
app.config.update(CONFIG)

# Initialise the app, connect to cache and backend
app.initialise()


class NereidHostChangeMiddleware(object):
    """
    A middleware which alters the HTTP_HOST so that you can test
    the site locally. This middleware replaces the HTTP_HOST with
    the value you prove to the :attr: site

    :param app: The application for which the middleware needs to work
    :param site: The value which should replace HTTP_HOST WSGI Environ
    """
    def __init__(self, app, site):
        self.app = app
        self.site = site

    def __call__(self, environ, start_response):
        environ['HTTP_HOST'] = self.site
        return self.app(environ, start_response)


if __name__ == '__main__':
    # The name of the website
    site = 'abcpartnerportal.com'

    app.wsgi_app = NereidHostChangeMiddleware(app.wsgi_app, site)
    app.debug = True
    app.static_folder = '%s/static' % site
    app.run('0.0.0.0')
You can now test run the application
$ python application.py
The above command launches a single threaded HTTP Server for debugging purposes which listens to the port 5000. Point your browser to localhost:5000
Now the installation is successful. Refer Nereid Project Tutorial.